


Fivootvi
Wood Chandelier
Wood Chandelier
Couldn't load pickup availability
Specifications
| Brand | Fivootvi |
| Product Type | LIGHT_FIXTURE |
| Item Type Keyword | chandeliers |


- 5 stars: 6 (75%)
- 4 stars: 1 (13%)
- 3 stars: 1 (13%)
- 2 stars: 0 (0%)
- 1 star: 0 (0%)
[Size: 8 Light, Size: 8 Light]
As others have reviewed - this is NOT fun to put together, but 100% worth it. I told my husband “I bought a new light for the dining room, but you need to read the reviews first and not be mad at me before installing.” “Those people are idiots. I’ll be fine.”Alas, those people are NOT idiots and we were not fine. I HIGHLY recommend that you divide the sticks on wire by length and place them in piles, far, far away from each other in clearly labeled piles and do NOT have someone with ADHD hand them to you to hang. That was the part that I “witnessed” that didn’t go well, but on top of that “I thought this would go up smooth - I didn’t think it would take 3 hours.”I’m not sure why it took 3 hours, because I stayed far away, but I CAN say it’s WELL WORTH IT! I spent years looking for the perfect light fixture that was “coastal, but not too coastal, modern, but not too modern, and unique”. It was well worth the wait. For $200ish I have what looks like a $2,000 light in my dining room. I love it!
[Size: 8 Light, Size: 8 Light]
It’s a little complicated to assemble but worth the effort and time took me 2 days.
[Size: 12 Light, Size: 12 Light]
This is a beautiful light and Amazon has the best price. We followed the pattern as outlined in the instructions - 60 cm, 57 cm, 51 cm, 54 cm. The wood pieces are measured in centimeters, so this might not make sense reading it now, but when you look at the instructions, you’ll get it. Start in the inside circle and work your way outward. It took us about 2 to 2 1/2 hours to complete. Again the most important thing is to follow the pattern of 60, 57, 51, 54.Note: when I purchased, the Amazon listing bundled it with E26 lightbulbs - that was not the right bulb. Please make sure you purchase E12 bulbs.
[Size: 8 Light, Size: 8 Light]
Very unique- black base could be more stylish like a copper color would be pretty. Still very cool. We had a professional install ours, took about 3 hours. He installed the base and lights and then strung all the would blocks and did the inner row first- until he reached the outside.We did a dimmer switch on ours- however not really sure you need one for this fixture.It came packaged very well with no broken pieces.Would recommend for someone who likes projects or a pro install.
[Size: 12 Light, Size: 12 Light]
This chandelier definitely is a statement piece and can enhance any room with its wooden charm. My dining room feels like a ' modern art room' in the museum now..thanks to this piece!Deducted 2 stars for these reasons:1. Product arrived with missing and broken pieces ( not enough wooden blocks, metal endings were falling off on some and two smashed bulb mounts) Tried to contact the seller but he was unreachable and not really responsive - amazon customer service could not help me.If I saw these upon opening the box - I'd probably return the product. Unfortunately, I was in the middle of putting things together when I saw things are missing and broken.2. Challenging assembly - takes good few hrs of patience and creativity. The instruction they sent is useless, could not find any videos for that ether. You need to figure out things on your own..and as in my situation - improvise and fix what's broken just to be able to put the chandelier on the ceiling.If you can get all the pieces you need undamaged and in one box - then go though the process of putting everything together - you probably will be happy with this piece.
[Size: 8 Light, Size: 8 Light]
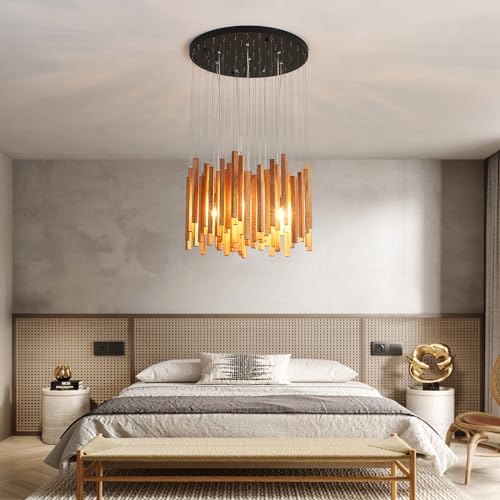
I can not even begin to say just how much I actually LOVE this light fixture. It is such a statement piece and matches our wood table perfectly. It has added so much joy to our room. The way the light comes through the wood planks is spectacular. It comes as kit- so be prepared to do a little leg work. It wasn't a difficult built but it did take a couple of hours. But it also means you kind of get to tell people you "made" it. ;)
[Size: 8 Light]
I was worried about the wood pieces being/looking cheap, they are great and pass on both fronts.We assembled it tot he instructions of a reviewer on here. Took hours to pre-hang all the wires, bundle them with rubber bands and then hang. If I did it differently in the future, I would have put lights and electrical on the base plate, prepared all the wood and wires and the layout, and hung only electrical and base plate tot he ceiling, and then took my time with hanging all the wires and wood. You will find you need to adjust and layout possibly anyways, and although it might be a shoulder workout, it's better than what we did and that other reviewer.
[Size: 8 Light, Size: 8 Light]
Firstly, I want to say this chandelier is gorgeous. It casts the most incredible shadows and I love it. I put it in a home we are selling, and I don't know if I could ever assemble another one despite how much I love it and how pretty it is. It was difficult to say the least.If you decide to attempt this, you will be building this from scratch, with the exception of carving the wood and forming the metal.Here are the biggest tips and the order I think you should do things, which is different than how I actually did it, because I learned what I could have done more easily. The directions are worth less than the paper they are printed on. Look at the pictures, but you've been warned.Step 0: Shut off breaker to the fixture before removing old fixture.Step 1:The wood blocks are plastic shrink wrapped, do NOT open them but just open the ends of the plastic to screw in the tiny eye bolts. I found a "monkey hook" to work perfectly as a screwdriver for this task.Step 2: it's tempting to start attaching wires to the blocks, but don't do it! This was my biggest regret later in my process. Step 2 you need to inspect, straighten, and replace many of the silver hooks that are on the metal baseplate. They are easily smashed during shipping. Tiny needle nose pliers help, but be careful as they are delicate.Step 3: Pull the bulb receptacles through the plate to the desired length, shorter than the 60cm wires and longer than the 54cm wires for the wood blocks. Firmly place the set screws on each bulb wire before wiring them all together at the back. There will be plenty of slack. (Twist together all of the 'L' separately from all of the 'N' and include the large fixture wire). I then used the black electric tape sleeves to hold these bundles securely, you can shrink them down to fit with a hair dryer, and it's much better than using the wire nuts on that many wires.Step 4:Attach the large bracket to the ceiling. A very important step that I forgot and turned out to be a huge headache was to first set the distance of the bolts that will hold the metal base plate, and *tighten the nuts* so they don't move! I cannot stress this enough, especially if you made the mistake of attaching all the wood blocks before hanging (yes, I did it the hard way)Step 5:Attach the wires (without the blocks) to the base plate. I recommend starting at the outside circle and going in the pattern around the base, then moving to the next row. Of course the number of attachment points doesn't exactly align to the suggested pattern evenly, so when you move in a row, shift the length of wire you started with over one spot so you don't have all the same length wires in a concentric row. I used the suggested pattern and it worked out pretty nicely. If I did mix it up it was in the center and so you can't even notice.Step 6: Wire the fixture in, white to white, black to black, ground to ground. Then attach the base plate to the ceiling bracket using those pre-spaced bolts that you remembered to set. (It won't be very heavy without the blocks because you followed my instructions and not the useless included ones!)Step 7-100: Attach your blocks to your wires that already have the perfect pattern you chose. Install bulbs.Step 101: Reset the breaker and admire your hard work and the money you saved on this DIY project.