



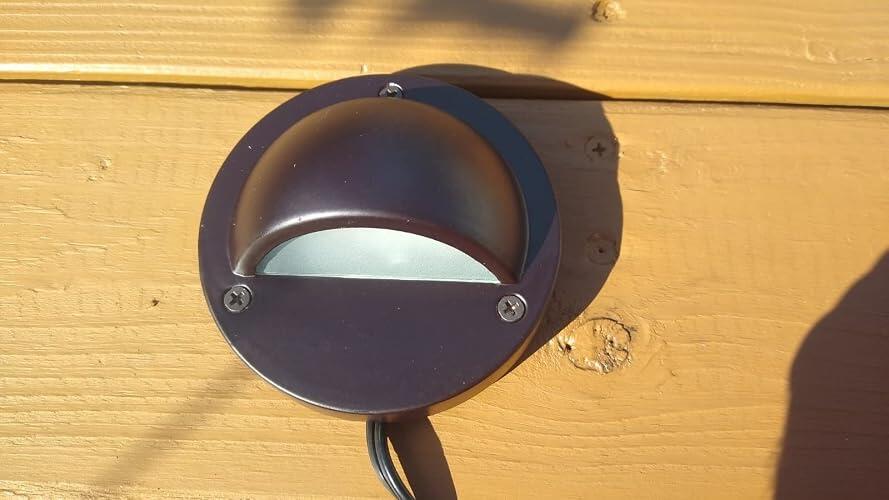
I installed these lights on my deck to increase safety and add some ambiance. These lights absolutely deliver. I am happy with the results, but I have to say that you have to have a good plan before you get started with installation to ensure you understand what you are getting into. If you do it right, you can achieve a fantastic, clean installation with no visible wires. To caveat everything you are about to read: I'm an engineer.One of the best features of these lights are how well the electronics are protected in the housing. Since these are outdoor fixtures, this is a must. As you can see from the pictures, the light is composed of two halves, with a silicone gasket ensuring a water resistant seal between the two halves. You can also see a nice bead of sealant fixing the frosted lens to the aluminum body. They did not skimp on the sealant, and as an added touch, they placed a bit of additional sealant to "tack" a small part of the silicone gasket to the front housing. This keeps the silicone gasket from rotating out of place, ensuring the holes are aligned when you put the two halves together again. This was done on all 12 of the lights I installed, so it was done deliberately. This was a nice touch. Anyhow, you can also see the back half of the assembly has the electronics board that has the LED elements. There are 18 elements per light. You can see there is a nice strain relief clamp and good solder joints going into the board. The power cable goes out of the housing through a nice rubber grommet, which does two things: prevent chafing of the conductors and protect against moisture/insect intrusion. Again, nice touches. The back housing has three other fastener through holes, so if you ever need to remove the front housing to clean it off, it will not affect the mounted piece that houses the electronics. This is good design. Each light comes with a small accessory bag that has three fasteners (each with a rubber gasket), three plastic anchors, a hole pattern template and two wire nuts (outdoor rated, silicone filled). For my installation, I chose to forego the plastic anchors and fasten directly to the wood, but it is a nice option to have. My other critique is the wire nuts are fairly small, and the typical gauge of landscape wire will make it a little difficult to insert thee conductors per wire nut (which would be typical in a parallel installation). I did not know the lights came with these, so I purchased other exterior rated wire nuts that were larger and suitable, but it is very nice to have these included.The best way to prepare for installation is to lay out the lights in the places where you think you will need them and hold them in place with painter's tape. Cut lengths of landscape wire and connect the system. An important note: if you choose to do this "fit and placement check" CONNECT THESE WITH REGULAR WIRE NUTS, so you can undo them later. Another great feature of these lights is that they can be powered by DC or AC 12V to 24V. What this means is you have options on power supplies depending on your application. Since my deck isn't huge, I decided to go with 12V DC. If you are intending on placing these along a long fence or deck rail, I would recommend an 12 or 24VAC power supply to ensure your lighting is equal brightness. If you go with DC, like I did, you have to be mindful of polarity. I chose the "ribbed" lead to be the return (ground) and the smooth side +12VDC. To geek out, I can tell you I did three parallel runs back to the supply, with 4 lights per run. This ensured even brightness. Anyhow, when everything is connected and ready, give it a quick power on test and check the lights. Once you verify they all illuminate, wait for it to get dark and turn them on again. Reposition the lights as needed. You can see the pictures of my power on and placement test as well. The next day, use the template (or simply use the holes on the back piece) to mark your mounting holes. You also have to ensure you mark a fourth hole for the power lead to go through the wood. If you do this correctly, you will not see the power cable. You're going to have to disconnect all the connections you made during the fit check and redo them once you've gone under or behind the deck boards to hide the cables. Make the final connections with the weatherproof wire nuts.There are some things you have to be careful with with these lights:1. When you are fastening the back half to the mounting surface, I recommend using a manual screwdriver. On the first light, I used a powered screwdriver, the bit slipped and I damaged the circuit board. I used a soldering iron and put the inductor back on there and repaired it, but lesson learned.2. The paint job on these lights is okay at best. The paint will scratch easily, so be gentle during installation. The good news is the front halves that get the brunt of the light will be easy to re-paint in the future.The pictures and video don't really do the lights justice. ...
[Color: Black, Number of Items: 12, Color: Black, Number of Items: 12]
Easy to install. Nice look around the pool deck.
[Color: Bronze, Number of Items: 6]
Beautiful lights, easy to install, even better than the older model.
[Color: Black, Number of Items: 12]
I was pleasently surprised the the quality of these lights. Aluminum body with glass lenses. Water & Dust proof. Better quality and lower priced that the kits at the big box local stores.
[Color: Black, Number of Items: 6, Color: Black, Number of Items: 6]
I used them to add accent lighting to my deck and stairs. They were easy to install and I liked the options of color temperatures. This is the second set I purchased. The first set of 6 was purchased earlier in the year and they've been working flawlessly.These come in a set of 6. If one of them doesnt work, you have to return the entire set.To ensure they all worked before installing them, I hooked each light to the battery of my cordless drill to ensure they were working properly. Because the way my luck works, I'll mount 5 of them and the 6th wont work. Then I'd have to undo all the work I did just to return the set.Fortunately both sets I purchased worked just fine and they look great.
[Color: Black, Number of Items: 12, Color: Black, Number of Items: 12]
These light are well made. Put out good light but not too much. My iPhone pics are “maybe” a little brighter than the real brightness,,but very close to the pictures. I’m running 220 feet of 12 gauge wire, 38 lights in parallel. All of them together draw about as much as a 100 watt lightbulb. I think they really look nice. They’ve been installed and running now for 4 weeks. I did buy the 3 year warranty on the lights just in case. According to the manufacturer they should last about 17 years running them 8 hours a night. We will see.They are a little tedious to install “at first”. You have to take out 3 small regular screws to remove the front housing then sit that aside. Then with the main housing, mark the 3 screw holes and main wire hole on the fence board. Then drill those holes. Then screw 3 wood screws with rubber O-rings on them to attach the main housing light fixture to the fence (O-rings on screws for no moisture problems) Nice…. Then re-screw the 3 small regular screws to reattach the front housing to the main fixture. It took me about 5 minutes a light to attach them to the fence and about 4-5 hours to run the wire on the fence and in the ground where the gates are then connect the lights to the wire. Or all day Saturday 😀 Note: These lights are about 70% LESS per light than Lowe’s or Home Depot where there’s cost $25.00 a light…$25.00 a light?? .AnywayI ordered 40 of these lights from Amazon (2 for backup) I had no issues with any of them. They are all working and made correctly. Based on what I know right now, I would definitely buy these again.
[Color: Black, Number of Items: 12]
I don’t usually write reviews. I am writing this one because I learned a few things that might help others. My plusses and minuses and installation tips appear below.I just installed 21 of them. Overall, I have given them four stars. I have only put voltage to 3 (I’m still wiring), and I can’t yet speak to longevity or durability. So far, with the exceptions below, all is well.First the minuses:• I received one pack (6 in the box) that was obviously a return. There were scuff marks on the black finish which someone tried to cover with a magic marker. Not good, Amazon. I installed these in a rustic setting, so I can live with the 3 I had to use. If you order these, I’d check before installing to see if they are in good condition.• It’s not clear the coating will be durable (see immediately above). It appears to be paint, not powder coated. They won’t get bumped much, but only time will tell how long before I have to repaint them.• As mentioned by other reviewers, the wire is way too short. If installed at waist height (and passed through a 3 ½ inch post), a connection is necessary well above deck level. To minimize the ugliness of the wire nuts they supply, I used solder connections and shrink wrap. But I had to do that on all 21 lights, which greatly complicated my project.• Also mentioned by others, there is no need for 21 allen wrenches. Also questionable are the supplied screw anchors, since I expect most installations will be into wood. Better to supply extra screws, longer wire and skip the wire nuts, allen wrenches and anchors.• Note that the outer diameter of these is larger than the standard 4x4 deck post, leaving about 1/8 inch overhang. This does not bother me, but it might bother you.• The drilling template proved useless, so I didn’t use them.The plusses:• These are reasonable quality, affordable lights at about $10 per light. Despite the quirks and problems above, they compare well against the 8 similar looking lights I have by Kichler at $75 apiece. If you are a perfectionist, feel free to spend 8 times more for a Kichler.• They really are easy to install (see below).• They are perfect for my deck installation. Properly spaced they provide a nice warm illumination that is both mood setting and an enhancement for safety (we have four stepdown levels to our deck).• Unlike some others, I had no problems with screw quality. No, they are not aircraft grade, but they don’t have to be if you use care (see below.).Installation tips:• Throw out those allen wrenches and get a screwdriver, either with a 3/32 hex bit or a T10 torx bit. I used the latter, and while torx heads are not the same as the hex head, it is perfect for this low torque operation. If I had to use those allen wrenches, I’d still be there.• Tools that make the job a snap: hex/torx screwdriver; awl; screwdriver or gun with Philips head; 5/16 paddle or twist drill bit (for going through a standard 4x4 post); 1/8 inch drill bit for piloting. In a perfect world, you’d have 3 guns: one for each drill size and one as screwdriver. I used two and changed drill bits.• After unpacking the light, carefully remove and set aside the three screws that connect the cover to the back.• Remove the cover and leave the gasket with the cover.• Place the light on the post where you want it. Allow at least 1/4 inch above the top of the back for clearance if you are mounting under a post cap.• With the awl, poke a hole for the top screw. Then poke an additional reference mark off to the side even with where the wire will go through the post.• Use your eye (or a level) to drill a 5/16 inch hole directly across from the reference mark and in the center of the post.• Pass the wire through the hole.• Align the light on the post and mark (or just drill) pilot holes for each screw. These pilot holes are important, and lack of them is probably the source of the complaints about screw quality.• After moving the rubber grommet to the head of each screw, screw in the mounting screws. If you use a gun, be extremely careful not to overtorque. The grommet sealing water out can easily be damaged or rendered useless if too much torque is applied. Snug is all that is necessary.• Replace the cover using the three mounting screws and hex/torx driver. Again, do not overtighten. Just push the cover firmly against the post and tighten the screws until they are snug.Once I got going, each light took about 5 or so minutes apiece.
[Color: Black, Number of Items: 6, Color: Black, Number of Items: 6]
** TWO YEAR FOLLOW UP** I installed these lights back around July 2020 and have not had a problem with any of the lights. Everything has worked as well as the day I installed which I was surprised by given the price of these units. Two years later and I still highly recommend these light and have installed them a few times more on other family members decks.These light are exactly what I was looking for. Not too small, not too bright, the light is not yellow or blue, it is a perfect balanceI wired these myself and it was very easy. They are waterproof and came with everything I needed to install. They included a template to help drill the pilot holes which was super helpful. They are metal and feel very durable. All items were in perfect condition out of the box and defect free. Have had installed for around 20 days and not a single issue.The video I posted makes the light look a bit cooler than it actually is. By no means am I saying it is yellow but it is not as cool as shown in the video. The photos also make it look a bit more yellow than they actually are.Update: almost a year later and no issues with the lights, thought I might get a burnt bulb by. Ow at this price point but everything works perfect! Love this product and couldn’t recommend it enoughMarch 2026 update: these lights are still going strong with not a single issue!